
Check your orders and manage them via the orders tab. You can check orders on different pages, such as E-commerce, Events, Pricing Table, Restaurant Reservations, and Schedule Booking.
To check and manage your orders:
In the Website Editor, click Pages.
Find the page you want to check the orders on and click the Edit button.
Click the Orders tab.
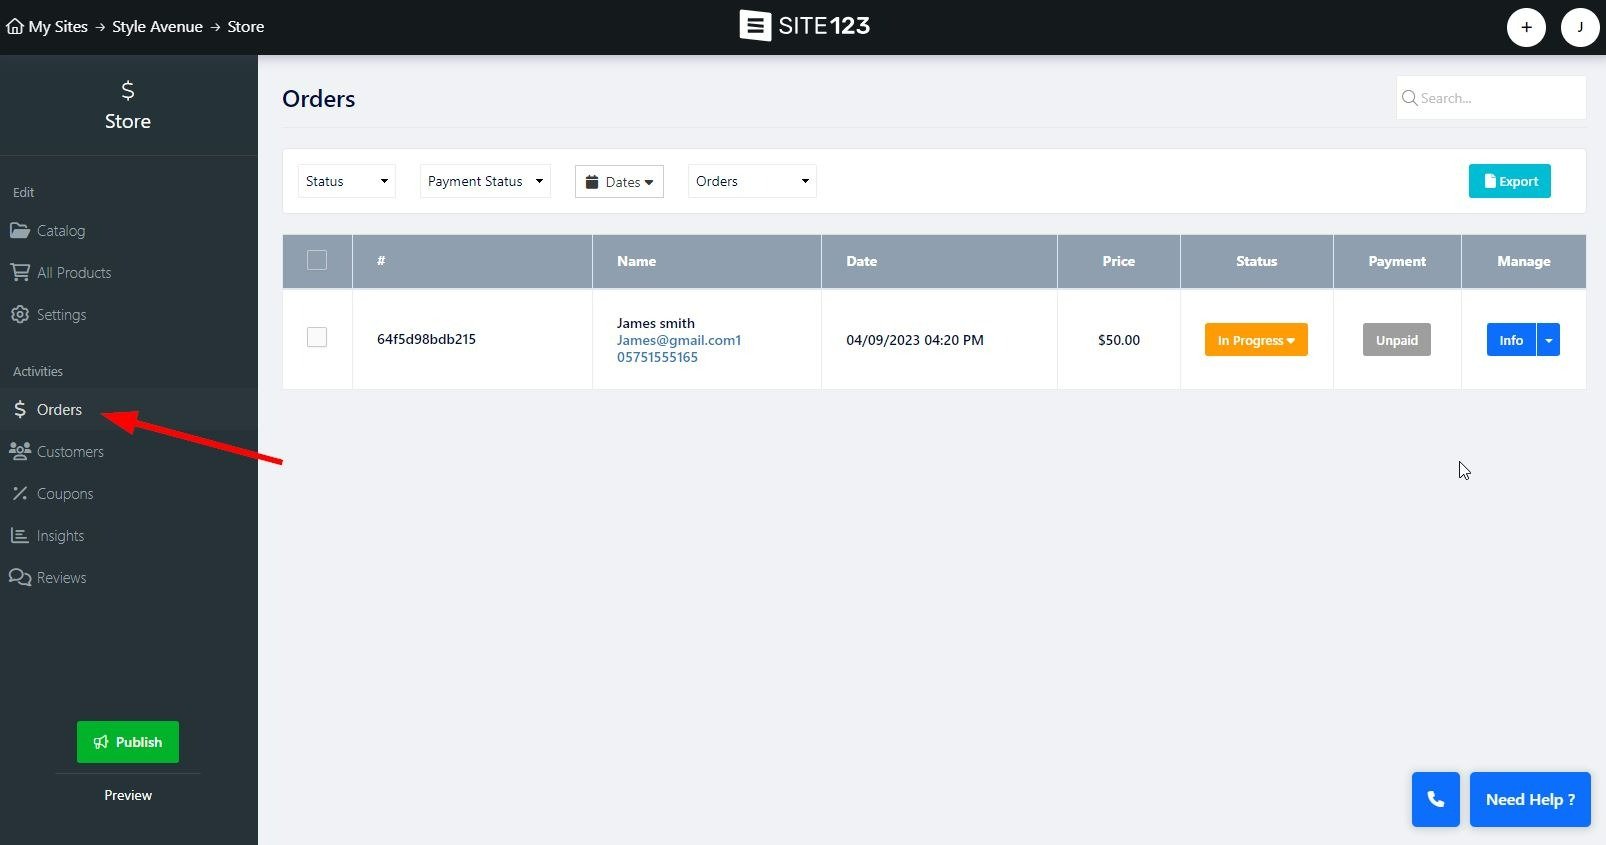
In the order screen, filter your orders by Status, Payment status, date, as well as current or archived orders.
Status - Select the order status. Select from New, In progress, Completed, and canceled. Using this filter will show you all orders under the selected status.
Payment Status - Use this to filter orders based on their payment status. Select from Unpaid, Paid, Refunded, Abandoned Cart, and in Progress.
Date- Set the date range on which the Order was made
Orders/Archived orders - choose on which list to apply the filter. Choose from current orders and archived orders.
Assigned Tag - You can set unique tags to orders, allowing you to filter all orders assigned to the selected tag. Read further to learn how to add a custom Order Tag.
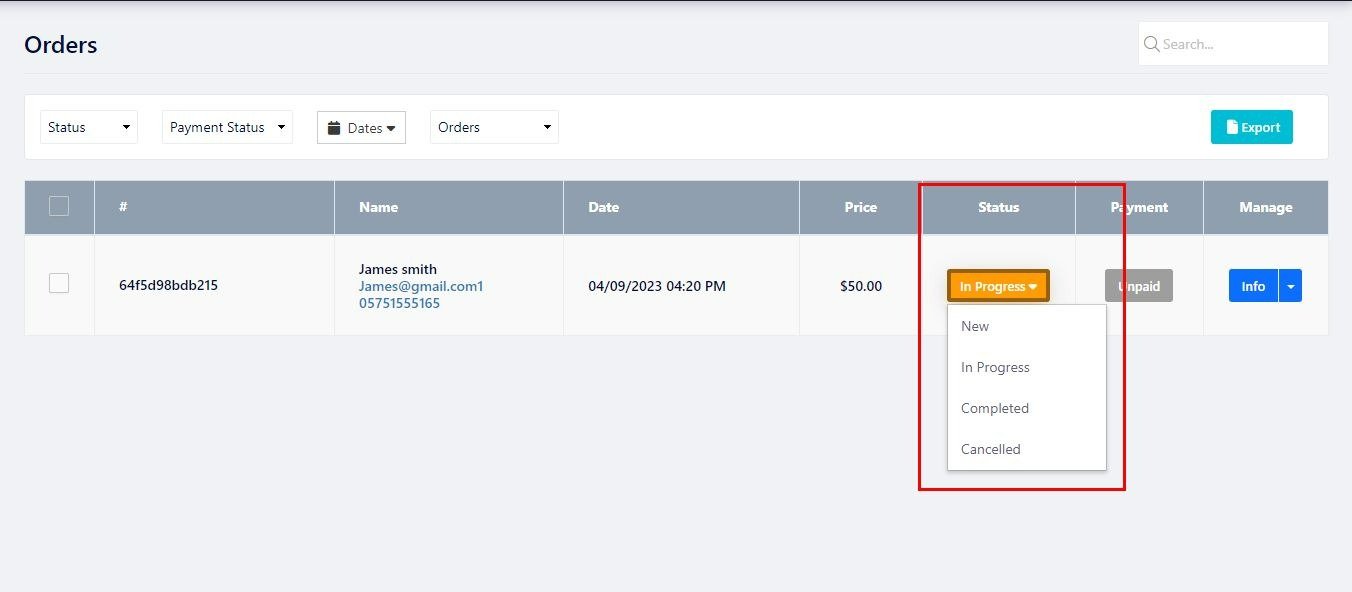
Here, you will see general information regarding your orders, such as order number, customer name, order price, and so on.
The order list is divided into the following columns:
Order ID ( Hashtag sign) - When an order is placed, it is assigned a string of numbers and letters. This is the order ID. You can use this ID to search for specific orders in the page search bar. Placing your mouse cursor over the order ID will prompt the Add tag option.
Add Tag - Place your mouse cursor over the Order ID, and you will be given the option to create a customized tag to accompany your orders. This will allow you to further categorize your orders by adding information relevant to you and your business. Use the color options to color code your tags, allowing you to identify tagged orders in your list quickly.
Name - Displayed the basic info for your customer, such as name, email, and phone number.
Date - displays the date the order was created.
Price - displays the order amount.
Status - displays the current status of the order. You can click the status of your order to change it. Note that some order statuses cannot be assigned, such as the Abandoned Cart status (read more about the Abandoned Cart tool ), and some Statuses can be assigned only from within the info window. Read further for more information.
Payment - Displays the current payment status of the order. The payment status will change according to the payment progress. If an order was paid, it will be marked as such automatically. You can manually mark an order as paid, canceled, and refunded from within the info window.
Manage - This column holds the Info and Send Message options. Read further to learn more.

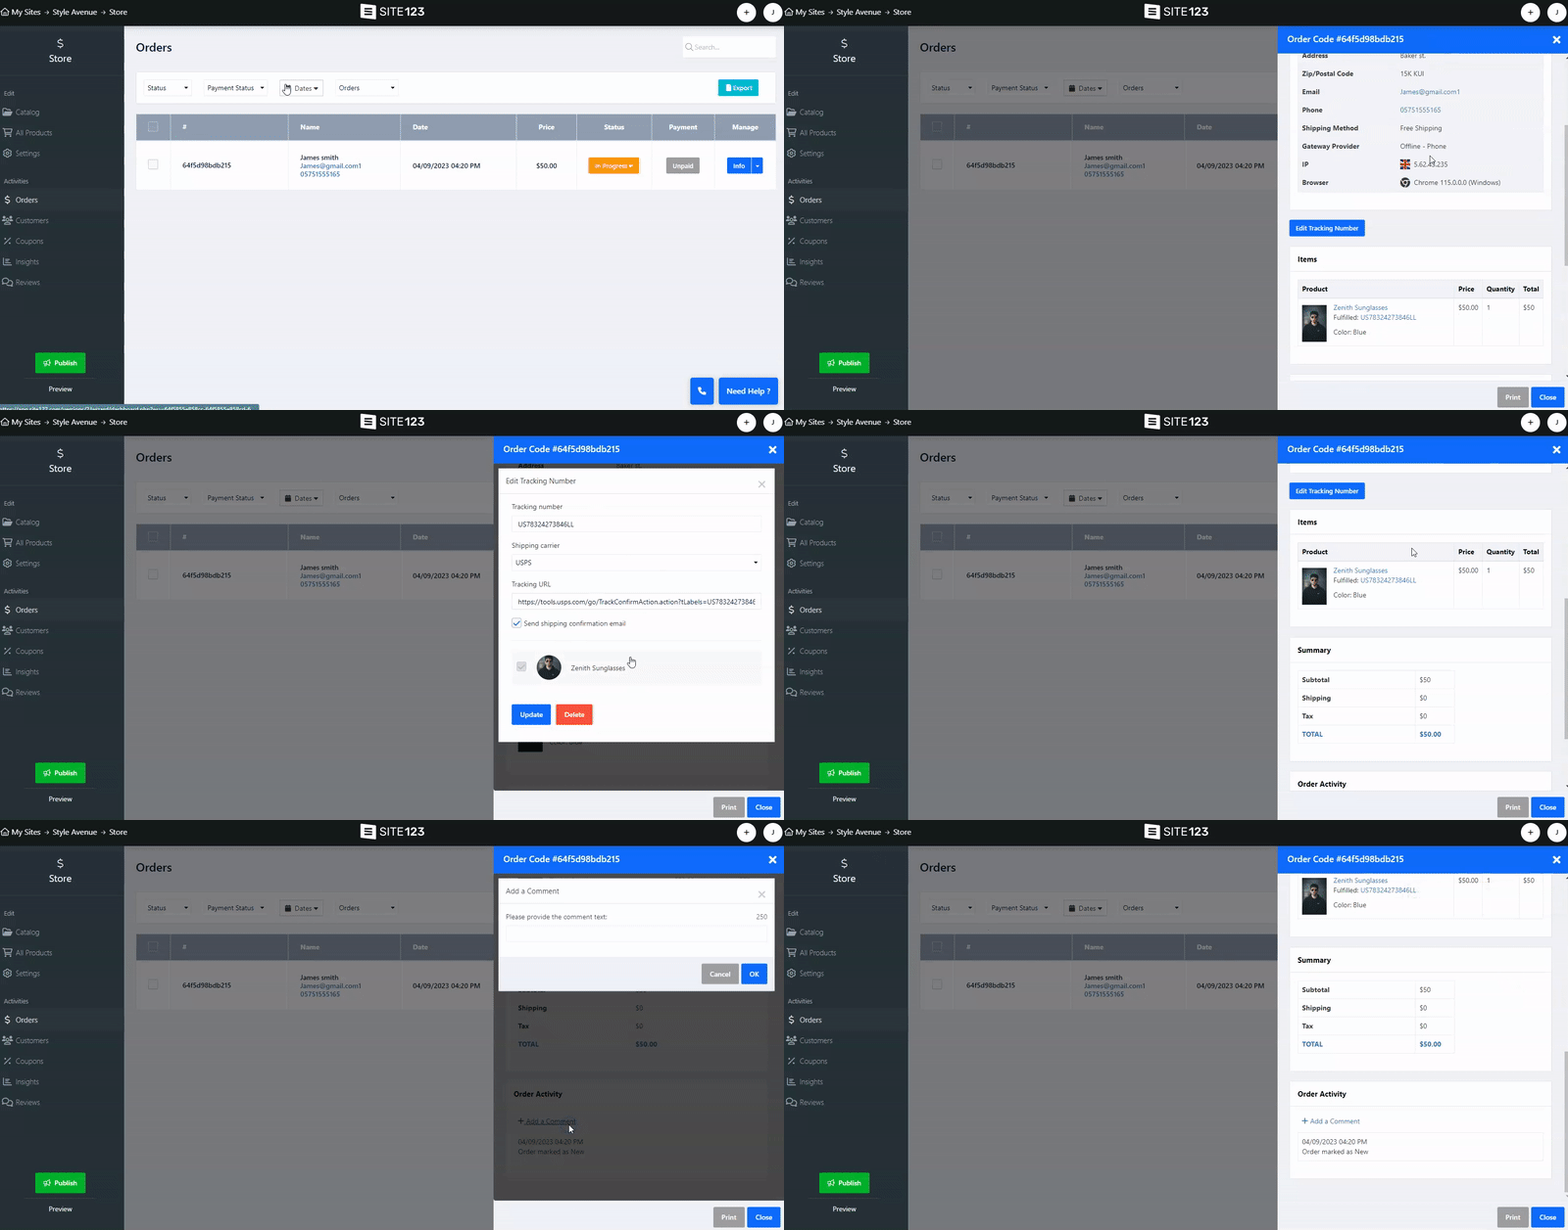
The info window will give you a more in-depth view of the current order.
You can view more information about the customer, the ordered product, the order summary, and the order activity.
Order info - This section will allow you to view more information regarding the customer who placed the order, such as country, state, address, zip code, and more. You will also be able to view the customer's IP and used browser.
Add Tracking Number - This option will allow you to provide your clients with a tracking number for their order shipment. You will be able to add the shipping company tracking number and identity as well as provide a tracking URL. Read more about Order Tracking.
Items - This section will display all the items your client purchased, the price, the number of items in the order, and the total amount. Clicking the item name will take you to the product store listing.
Summary - This section will display the order's total amount as well as Tax and Shipping costs.
Order Activity - This section will allow you to view the order's activity, such as added tags, Status change payment date, etc. Each record has its date and timestamp to allow you to view the changes in the selected order and its progression.
Print - Use the print option to print out the order information.
Managing your orders on SITE123 is even easier with introducing the Archive Orders and Easy Refunds features.
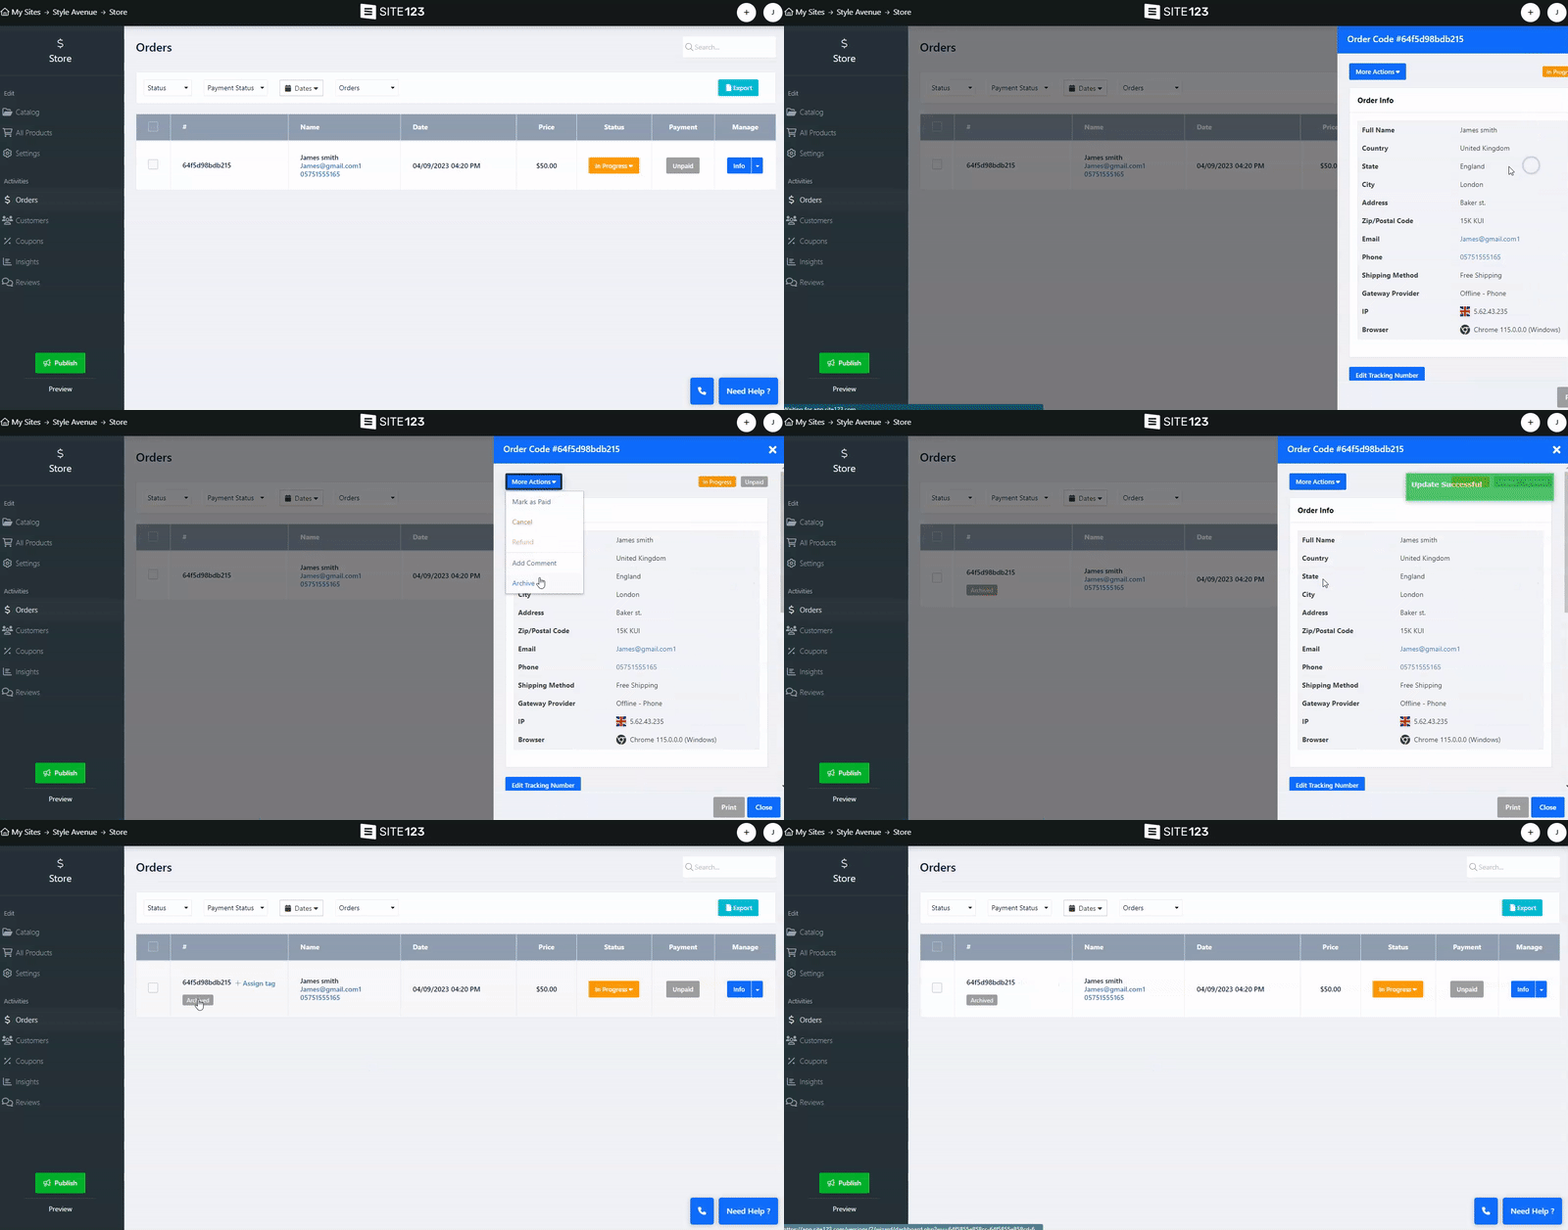
The Archive Orders feature allows you to archive orders directly from the order info page, eliminating the need for "Delete" buttons and streamlining your order management interface. Simply switch between active and archived orders using the "Orders" and "Archive Orders" filter options. This feature is available across various modules, including Store, Events, Online Courses, Pricing Table, Schedule Booking, and Donate.
To archive Orders, mark the relevant order and click the Archive option at the bottom of the screen. You can archive individual orders from within the info screen by clicking More Actions and selecting Archive.
Please note that you can archive more than one Order at a time by marking all relevant orders and then performing the action.
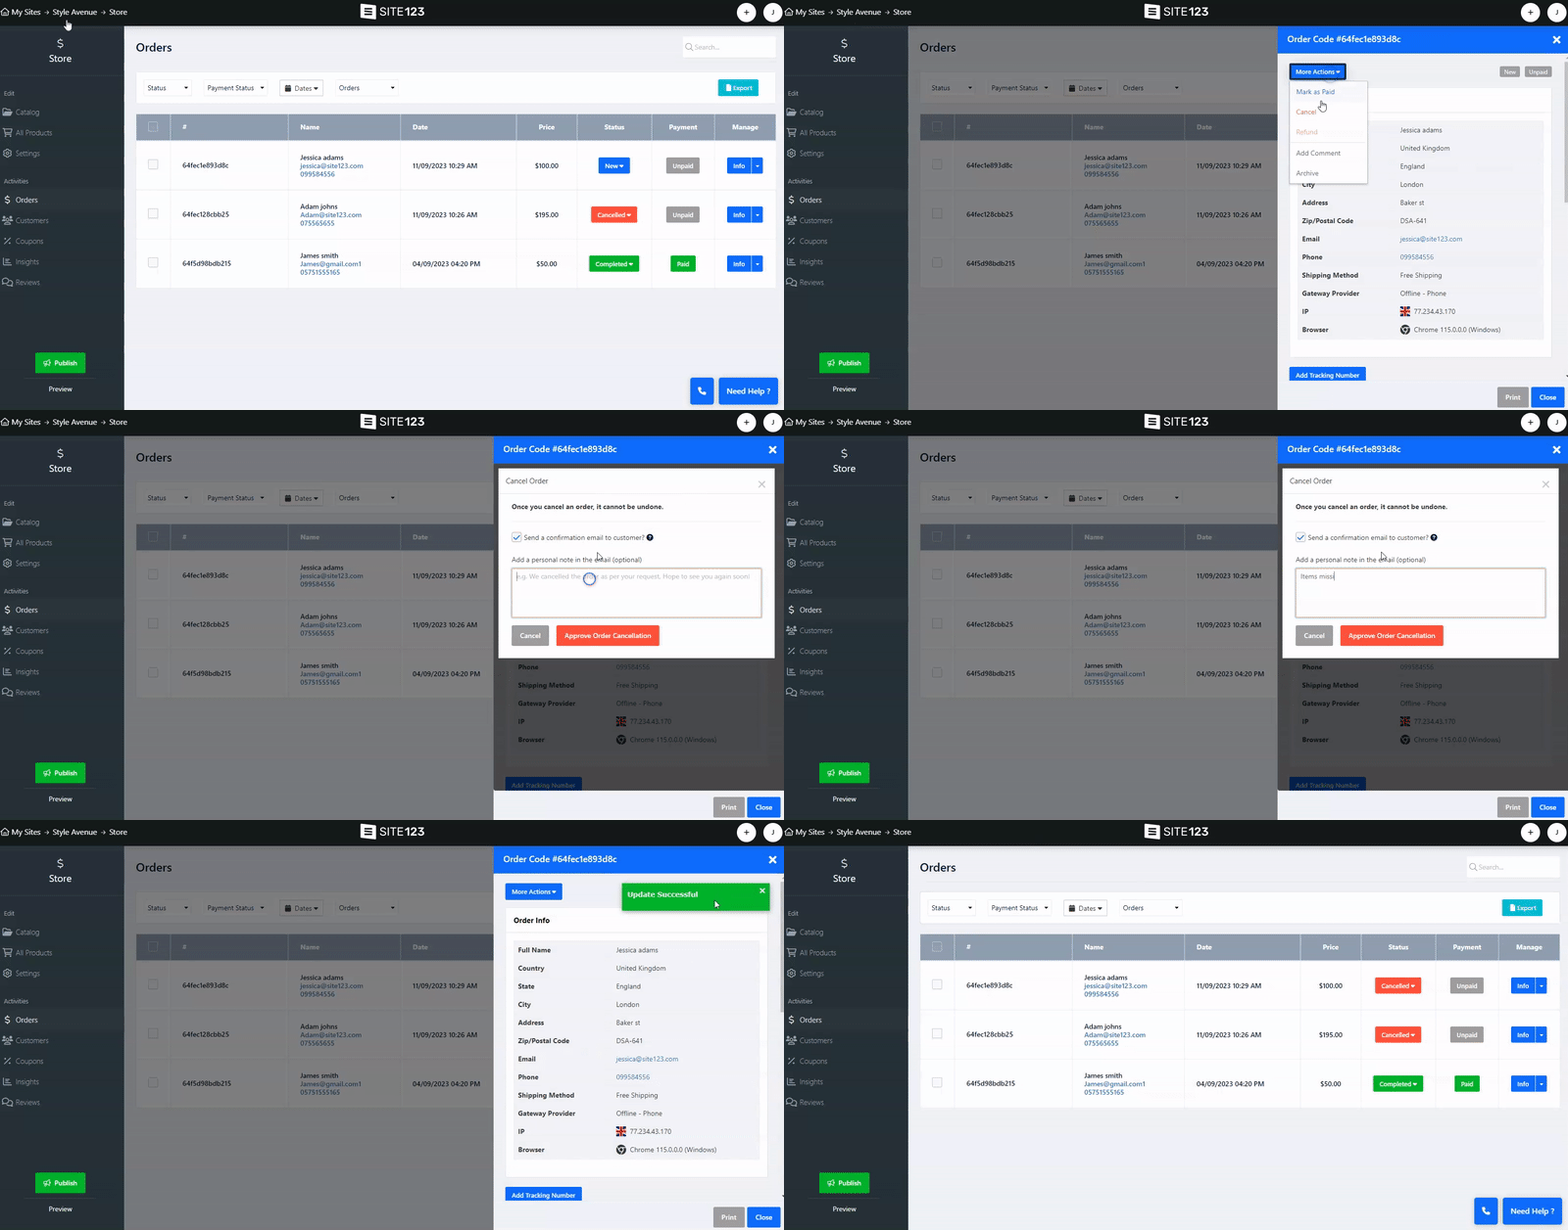
We've made the cancellation process straightforward and efficient. You can easily cancel an order from the Order Info Page, where the cancellation option is presented as an order action. To cancel an order:
In the order screen, click the Order’s current status and select Cancelled.
Alternatively, you can perform the same action from the order info screen by clicking More Actions.
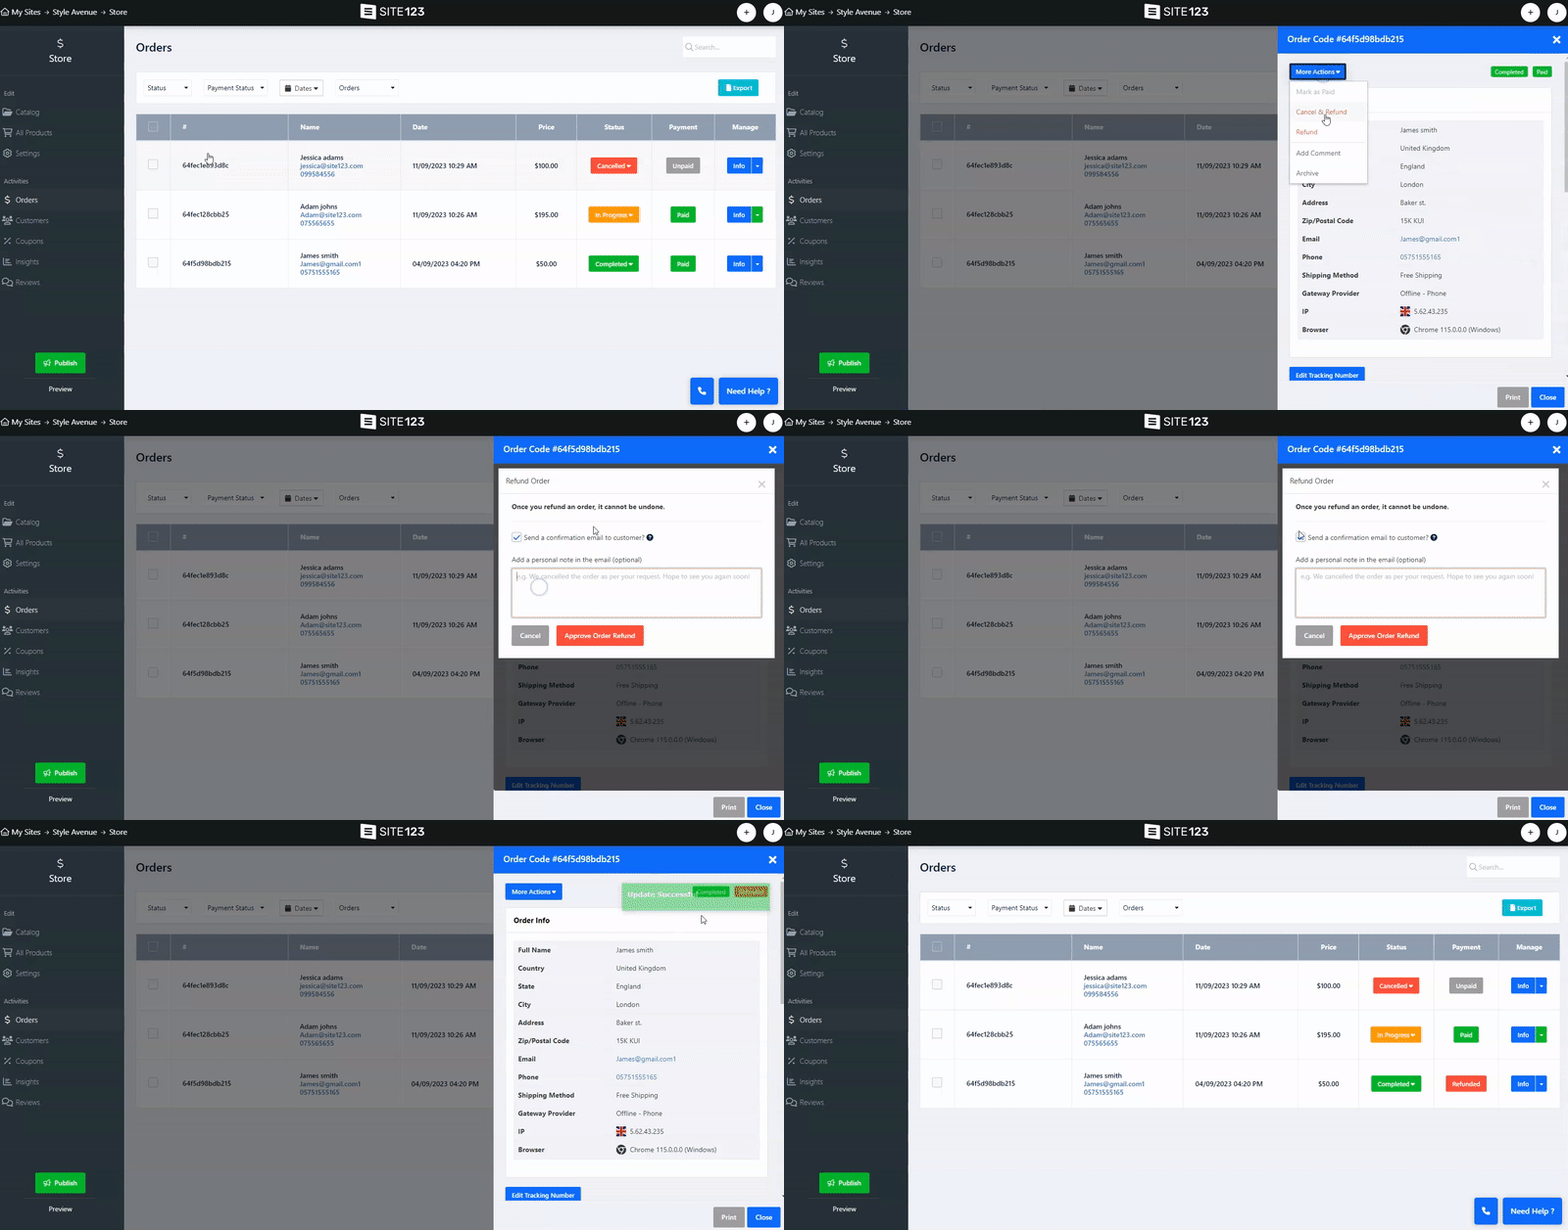
Refunding paid orders that haven't been canceled is now also a breeze. When you need to refund an order, simply set its status to "Refund," the payment status will automatically change to "Refunded," making tracking and managing your refunds easy.
Once an order has been refunded, it cannot be marked as paid or unpaid again, helping you maintain accurate payment records. To refund a payment:
In the Order screen, find the relevant order and click Info.
Click More Actions and select the Refund status.
Additionally, to ensure seamless stock management, an automatic inventory update has been implemented. When you refund an order, the inventory for the related products will automatically increase.
👉 Note: Setting the Order as Refund is used to mark refunded orders so you can track them within the system.
Choosing this status does not refund the client’s payment. Refunding the client must be done on the side of the copayment method that was used to make the order.
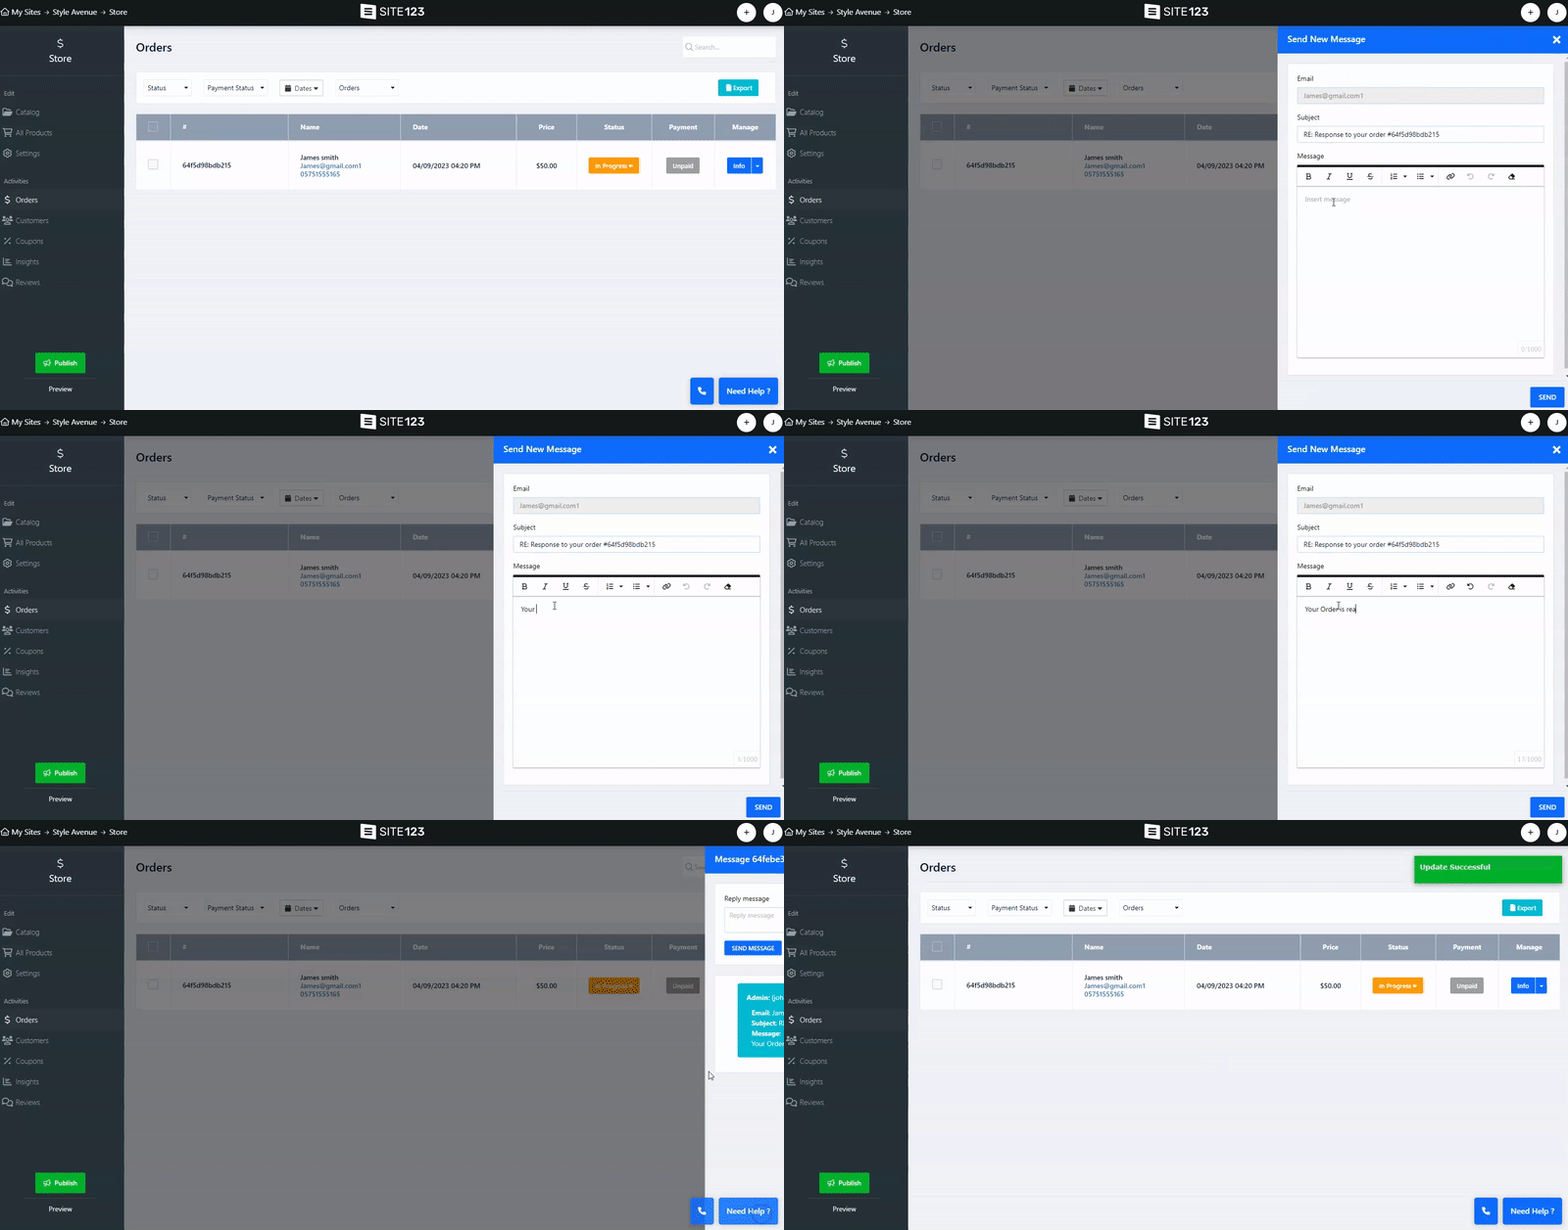
Through the order screen, you can also send direct messages to your customers,
Click the Downward Pointing Arrow next to the info button, and select Conversation.
Create and send your message from the Send New Message screen.
Your customer can reply to the message using a dedicated Reply button in the received email.
Once a reply is submitted, the new message will be added as a thread to the initially sent message, You can then reply back and communicate with your customers directly from the order screen.
Use the export option at the top of the order screen to export your current order list in CSV format.
